Check License state of Objects

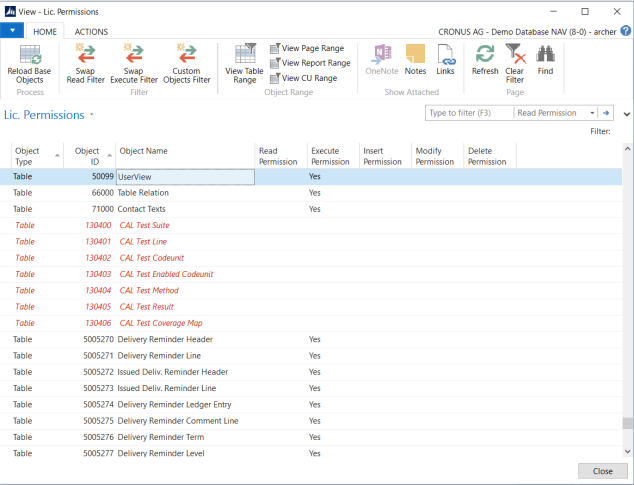
In Nav forums it’s quite often asked, how to check, if a object is within the current loaded license. There are some solutions for Nav 2009. I did not find a satisfying solution for newer Nav versions. So i’ve developed a “License Permission” Page, which lists Objects and their Permissions. Object IDs, which are not in the current loaded license, means there is no read or execute permission for that Object ID, are displayed red. When running the page the list of all nav objects in the database is loaded.

licperm

The buttons in the page:

licperm2

Reload Base Objects: List all current database Object IDs
Swap Read Filter: Switch between 3 Read Permission Filter settings ” “, Yes|Inherited, No Filter
Swap Execute Filter: same as button above for Execute Permission
Custom Objects Filter: List objects between Object ID 50.000 and 99.999.

licperm3

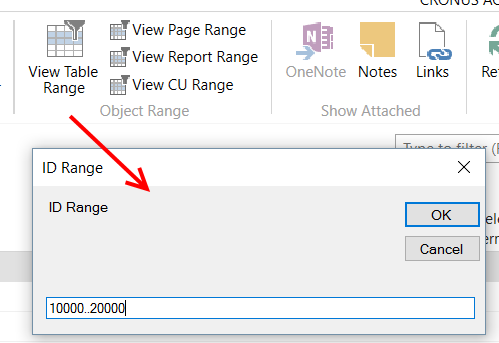
The object range buttons:

View Table Range: List all table Object IDs according the filter you set.
View Page Range: List all page Object IDs according the filter you set.
View Report Range: List all report Object IDs according the filter you set.
View CU Range: List all codeunit Object IDs according the filter you set.

You can download the page source code here.

The license information is saved in table “License Permission”. With a page on base of that table the windows client freezes, because the data load is really huge, especially, when filtering. So i developed that kind of solution.

cheers

Working with Excel Documents in Nav

nav-xls

Dynamics Nav is shipped with the opportunity to export every report as Excel document. Additional there is Table ExcelBuffer for exporting each kind of data. An example for this table’s usage is the action “Export to Excel” in Page “G/L Budget”.

In table ExcelBuffer there are used some very helpful .net assemblies shipped with Dynamics Nav to cover the interaction with excel.

In Nav forums there are quite often questions about importing or exporting data from/to Excel. So i wrote a sample, where you can see, how to work with these assemblies.

xls1

  • An excel file is opened
  • Adding a new sheet
  • Write a value to the new sheet
  • Close the WorkbookWriter Object to close the current Excel session
  • Open the Excel document in Excel with standard Excel Interop assembly

xls2

The variables: this is the Nav 2013 version, so here is used Microsoft.Dynamics.Nav.OpenXml vs. 7.0. In Nav 2015 use vs. 8.0 instead.


How to vote on Microsoft.Connect

Weeks ago i’ve voted for a new dynamics nav feature. It was not easy  to do that. Other people had also problems with that. So for those, who also like to suggest new features or ask for hotfixes, there is a guide:

  • Goto http://connect.microsoft.com/.
  • Sign in with your Live account or create one: Top right corner, drop down list, select `Microsoft Account`. To sign in you need special product permissions. If you get a “Access denied” message, you have to less permissions. Then please contact your nav partner or microsoft support.
  • After logging in, search through the product directory for Dynamics NAV and join the NAV Group. That’s needed for further options.
  • Select then Microsoft Dynamics from the drop down in the top right.
  • There you click “Search existing” and search for “Notifications”, then select the bug/feature from the list.
  • Now you can vote . If you want, you can write a feedback e.g. “That’s an annoying bug, the customers call me every day, …”.

Build or buy solutions

i read an quite interesting, but obviously hidden commercial, posting about build or buy a solution for EDI. it’s right, that this is often not an easy decision, if you need a new module.

one point is missing in that posting: if you buy a so called ready-to-use solution, in most cases, it is not ready-to-use. you should reckon at least 30% of the budget for customization. The custom solution can be the cheaper solution, if there is no buy-solution on the market or the available solutions are only usable with a huge amount of customizations. For managing a custom project you could read this blog posting.

Send mail with different reply-to address – part 2

Like the in cu 400 used mailing .net assembly the one used in cu 397 has very basic functionality, assembly Microsoft.Dynamics.Nav.Integration.Office. So if you want to use additional properties like setting a different reply-to address or using as different sender address, it is needed write it’s own code using basic .net assemblies. In  part 1 of this series i showed how to send smtp mails with the opportunity to set a different reply-to address. In this part i who, how to get the same with oulook based functionalities.

// variables
olApp, DotNet, Microsoft.Office.Interop.Outlook.ApplicationClass.'Microsoft.Office.Interop.Outlook, Version=15.0.0.0, Culture=neutral, PublicKeyToken=71e9bce111e9429c'
olMailItem, DotNet, Microsoft.Office.Interop.Outlook.MailItem.'Microsoft.Office.Interop.Outlook, Version=15.0.0.0, Culture=neutral, PublicKeyToken=71e9bce111e9429c'
olItemType, DotNet, Microsoft.Office.Interop.Outlook.OlItemType.'Microsoft.Office.Interop.Outlook, Version=15.0.0.0, Culture=neutral, PublicKeyToken=71e9bce111e9429c'

SendOLMail()
IF NOT ISNULL(olApp) THEN
  CLEAR(olApp);
olApp := olApp.ApplicationClass;
olMailItem := olApp.CreateItem(olItemType.olMailItem);

olMailItem."To" := 'receiver@test.com';
olMailItem.Subject := 'subject text';
olMailItem.Body := 'This is the message.';

// set reply-to address
olMailItem.ReplyRecipients.Add('replyAddress@test.com');
olMailItem.Send;

CLEAR(olMailItem);
CLEAR(olApp);

for using a different sender address in outlook mails follow this post.

cheers


Send Mail with different Reply-To Address

The properties of the used .net assembly Microsoft.Dynamics.Nav.SMTP in CU 400 is very basic, e.g. applying a different Repl-To Address is not possible. For that it’s needed to go to the basics, means use the basic .net classes for Mailing. Following codeunit is a solution for that issue.

// global variables
SmtpClient, DotNet, System.Net.Mail.SmtpClient.'System, Version=2.0.0.0, Culture=neutral, PublicKeyToken=b77a5c561934e089'
MailMessage, DotNet, System.Net.Mail.MailMessage.'System, Version=2.0.0.0, Culture=neutral, PublicKeyToken=b77a5c561934e089'

OnRun()
// Test the mail functions using a sample gmx mail account 'your_account@gmx.at'
CreateMessage('sender name','your_account@gmx.net','your_account@gmx.net','subject','message text','reply name','replyTo@gmx.net');
SendSmtpMail;

CreateMessage(SenderName : Text;SenderAddress : Text;Recipients : Text;Subject : Text;Body : Text;ReplyToName : Text;ReplyToAddress : Text)
// local variables
FromAddress, DotNet, System.Net.Mail.MailAddress.'System, Version=2.0.0.0, Culture=neutral, PublicKeyToken=b77a5c561934e089'
ReplyAddress, DotNet, System.Net.Mail.MailAddress.'System, Version=2.0.0.0, Culture=neutral, PublicKeyToken=b77a5c561934e089'

// create from address
FromAddress := FromAddress.MailAddress(SenderAddress, SenderName);

// create mail message
IF NOT ISNULL(MailMessage) THEN
  CLEAR(MailMessage);
MailMessage := MailMessage.MailMessage;
MailMessage.From := FromAddress;
MailMessage.Body := Body;
MailMessage.Subject := Subject;
MailMessage."To".Clear;
MailMessage."To".Add(Recipients);

// create and add reply-to-address
ReplyAddress := ReplyAddress.MailAddress(ReplyToAddress, ReplyToName);
MailMessage.ReplyTo := ReplyAddress;

SendSmtpMail()
// local variables
SMTPMailSetup, Record, SMTP Mail Setup
NetworkCredential, DotNet, System.Net.NetworkCredential.'System, Version=2.0.0.0, Culture=neutral, PublicKeyToken=b77a5c561934e089'

SMTPMailSetup.GET;
WITH SMTPMailSetup DO BEGIN
  SmtpClient := SmtpClient.SmtpClient("SMTP Server","SMTP Server Port");
  SmtpClient.EnableSsl := "Secure Connection";
  IF Authentication  Authentication::Anonymous THEN
    IF "User ID"  '' THEN BEGIN
      SmtpClient.UseDefaultCredentials := FALSE;
      NetworkCredential := NetworkCredential.NetworkCredential("User ID", Password);
      SmtpClient.Credentials := NetworkCredential;
    END ELSE BEGIN
      CLEAR(NetworkCredential);
      SmtpClient.Credentials := NetworkCredential;
      SmtpClient.UseDefaultCredentials := TRUE;
    END
  ELSE BEGIN
    CLEAR(NetworkCredential);
    SmtpClient.Credentials := NetworkCredential;
    SmtpClient.UseDefaultCredentials := FALSE;
  END;

  IF ISNULL(MailMessage) THEN
    ERROR('Mail msg was not created');

  SmtpClient.Send(MailMessage);
  MailMessage.Dispose;
  SmtpClient.Dispose;

  CLEAR(MailMessage);
  CLEAR(SmtpClient);
END;

The Smtp Setup:
smtp-setup

Mail sent result:
smtpmail-result

you can also use that codeunit for other purposes as template, e.g. for setting a different sender address.

for sending outlook mails with different reply-to address follow part 2 post of that series.

cheers
 

Setting up precisions

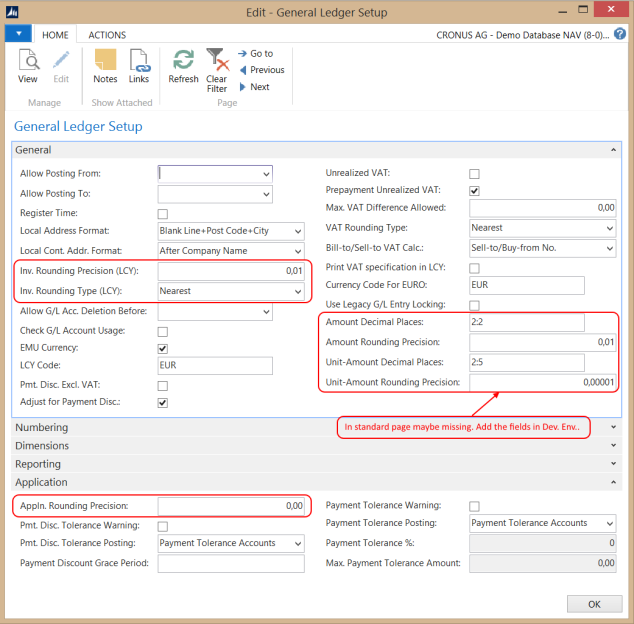
In Dynamics Nav amount and currency precisions are set on a central point, in the General Ledger Setup. These settings apply for the LCY (Local currency). Foreign currencies are configured in page Currency Card (on base of table Currency).

gl-setup

Fields “Amount Decimal Places”, “Amount Rounding Precision”, “Unit-Amount Decimal Places” and “Unit-Amount Rounding Precision” are maybe missing in this page. In the standard page they are not shown. In that case adde them to the page in the development environment.

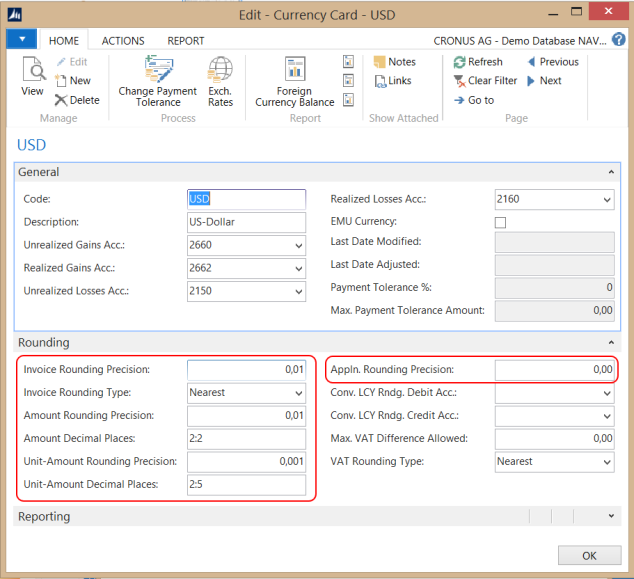
curr-setup

In the currency card you can configure foreign currencies. Here you find the same fields to set the precision as in the general ledger setup. This is also the place to set/update the exchange rates.

For details about the fields in G/L Setup follow
https://msdn.microsoft.com/en-us/library/hh168649(v=nav.70).aspx
https://msdn.microsoft.com/en-us/library/hh169567(v=nav.70).aspx

For details about the fields in the Currency Card follow
https://msdn.microsoft.com/en-us/library/hh169173(v=nav.70).aspx
https://msdn.microsoft.com/en-us/library/hh170490(v=nav.70).aspx
https://msdn.microsoft.com/en-us/library/hh168784(v=nav.70).aspx

Additional it’s possible to activate automatic invoice rounding:
To make sure that sales and purchase invoices are rounded automatically, you must activate the invoice rounding function. In the Search box, enter Sales & Receivables Setup or Purchases & Payables Setup, open the page, on the General FastTab, select the Invoice Rounding check box. You can activate invoice rounding separately for sales and purchase invoices.

cheers


Reached 10.000 blog views

Hi,

some days ago i recognized, that my blog on wordpress.com reached more than 10.000 views!

blog-views

Additional i reached more than 58.000 views on the mirrored blog of the Dynamics Nav Community blog site and over 2.500 views on the mirrored blog of dynamicsuser.net!

Thanks to all have viewed my postings for your interest! I will continue writing posts.

cheers
jonathan


How to: Manage a mobile app project

When a custom mobile client for Dynamics Nav is needed, there are a couple of ways to implement that. A couple of questions need to be answered, major decisions have to be made, especially, if you do want use the app not only for yourself, but you want to provide the app in online stores, provide it your customers.

Using ready-to-use solutions:

  • Anveo: Full mobile client for Dynamics Nav especially for Sales People. Provides offline working.
  • Mobile Nav: Ready-to-use mobile client, customizable, extensible, can be used online and offline (!), Secure comunication, barcode scanning, direct printing from device, multilingual; available for Android, IOS, Windows; usable for Nav 2009 R2 – Nav 2016
  • Sana Mobile: similar features as ‘Mobile Nav’, but only available for IOS (Apple devices: IPhone and in the near future also available for IPads). The app is optimized for sales agents.
  • Dynamics Mobile: similar features as Mobile Nav

Starting from scratch:

This is maybe the more expensive and more time consuming variant, but you can develope a full custom solution. For the mobile app you need an Sdk according the OS (Android, IOS, Windows). At the end it could be that you have to develope the mobile client 3 times. You have also to decide, if you want the get an online only app or if it also usable offline. Alternatively you could develope a web solution, which runs in the device browser.

The mobile app is then connected to the Dynamics Nav system with Nav web services. Nav web services are nav objects like codeunits and pages, which are so called published as .net web services, they are based on the SOAP protocol. For details goto here. If you go that way and want to use nav web services, i recommend NOT to use standard nav objects, especially not to use pages, because that is unsecure and you publish much more functionality than you want or need. Nav web services based on SAP are available since Nav 2009. Since Nav 2013 ODATA is provided, a new web service technology, quite faster, but with that Nav version only for read operations. Since Nav 2015 ODATA is usable for read AND write operations.

Prepare you project:

Start with a market study:

  • What are the existing solutions?
  • Are they suitable for you, are they customizable?
  • Are they usable online and offline, if needed ?
  • Which platforms are supported (Android, IOS, Windows), which do you need/want ?

Features:

  • What features, functions do you really want/need in your app? The few the better !!
  • Only provide the really needed functions (cheaper, faster): i suggest start for the first version with item list, customer list, vendor list, sales orders, purchase orders; additional the possibility to view, maybe edit the entries.

Users:

  • Which users do you target: “normal” end users, sales persons, CEOs? Different types of users may need different functions, different interfaces.
  • Ask some of your customers what they would expect from your mobile app

Interface:

  • The Gui, the interface of the app is the main thing. Always start with the gui; it should be cool, easy to use, should make the WOW effect. You’ll need a graphic designer for the gui.
  • Create the custom codeunits with the needed functions AFTER the gui, not vice versa, because that won’t work, will end in a crashed project.

so have fun with your mobile app project.

cheers